Power Automate: A complete guide for when you’re creating flows (for non-technical people)
This cloud-based platform has had an incredible impact transforming business operations across industries. The strategy of low-code and the non-technical approach has worked exceptionally well. However, I tend to disagree with the no-code/low-code statement as, for business users, there is still technical knowledge you need to embrace before jumping in and working properly on a Flow. When I first started I was told it is a low-code tool that easily enables you to run different workflows. Although this is true, I have to admit that I struggled to get used to the way Power Automate works.
In this post I will guide you through a few strategies that I would highly recommend when you are working with Power Automate.
Audience:
This post is specifically designed for people who don’t have a particular background in IT, Programming, ICT or any subject related to Computing or Programming. I would recommend this post particularly to Functional Consultants, Associates, Business Analysts, Project Managers or Business Users who have a basic knowledge of this cloud-based platform.
8 things you should consider when you are creating flows in Power Automate (Microsoft Flow)
1. Acquire basic knowledge of Computer Science and Programming
This might sound odd, but surprisingly there are so many people out there, like me, working in the Microsoft world without any technical or IT background. This was one of the first things that facilitated my understanding in so many technical areas across the Microsoft world. One online course I’d like to recommend is called Computing Science Principles: Programming. You can find it on the LinkedIn Learning section (currently one of my favourite learning portals).
It’s a short, concise and easily-explained course that contributed a lot to helping me get my head around this topic. It explains basic things about the structure, the logic and different programming languages that eventually you will come across when managing Power Automate.
2. Define queries within your components
One of the most important things to remember when building a flow is to set up the parameters correctly, or defining your query. The more specific you are the better, as the flow will know exactly how and where to perform the actions. When you start defining the trigger, you first need to select the entity (table) and then it is very important you specify the ‘Colum filter‘ (previously called Filter query). And in some cases if you need to be more specific, you could add the ‘Row filter‘ (previously called Expand query).
So you are telling the system: please do such and such, when I’m doing something within my Contact list (Your Entity) and I’m changing the ‘Type’ (Column) to ‘Suppliers’ (Row). The system will know exactly when and where to start working. This will improve not just the performance, but the functionality of the flow. As you do this with the Trigger you would do it with other components as well, remembering, the more precise you are, the better the flow will work. Now, to know exactly how to properly write the query, check out my next step.
3. Retrieve all the information before you set actions/conditions
Before performing any action you need to set in place all the data you are going to use and tell the system what it needs in order to perform them. It is highly recommended that you add them in the flow before you add Conditions or Actions, as they will “call” and “search” into that data in order to retrieve values, narrow the query or execute functions. Two of the most common components are: Get List and Get Record. Let’s see this with an example.
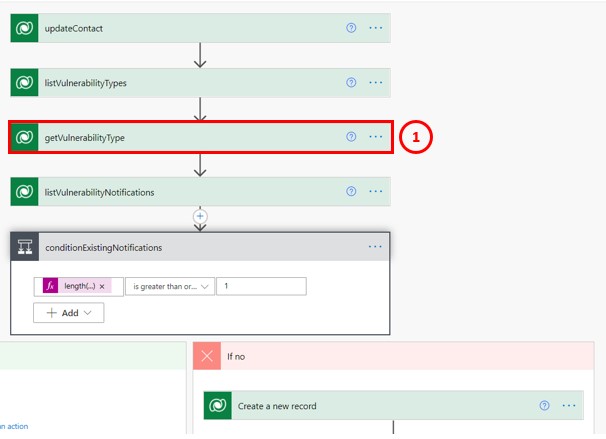
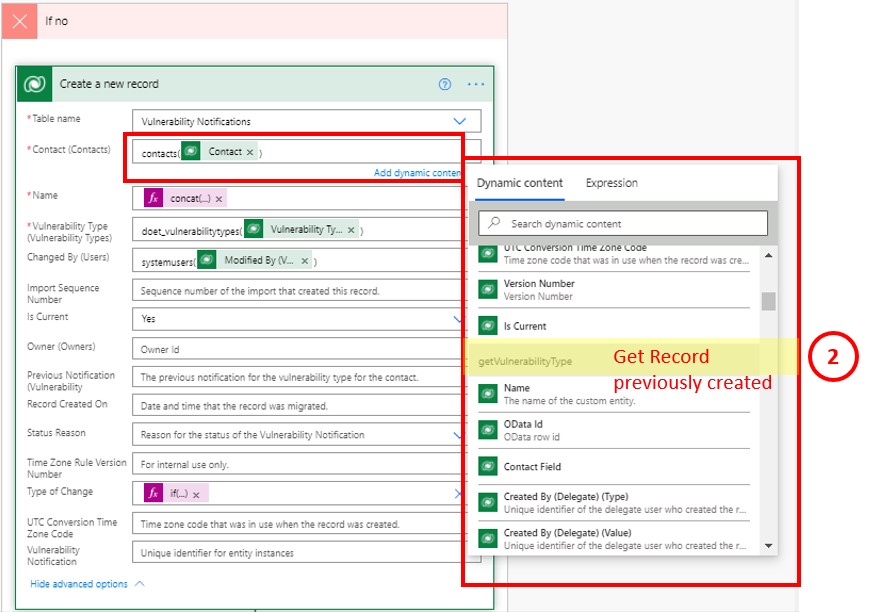
For instance, I have a flow where I have added a list of an entity called “Vulnerability Type” and I have narrowed the query to get only the first element on that list. Then, I’m creating a condition, and in the ‘Yes’ path of that Condition, I’m telling the system to create a new record. Note that the Dynamic Content you see in the image is bringing the values of components I have previously added into my flow and you can notice because of the name of that component. So, because I have previously added the getVulnerabilityType (‘Get record’ component), I’m able to bring any value retrieved from that entity and it’s query. This option allows you to add a Dynamic Content (of that related entity) instead of a fixed value within your form.
4. How to properly define the queries using ODATA Query and Filter Array
As non-technical professionals working with flows, we might find it difficult to set the queries in the appropriate way. When you are working in Power Automate there are 2 ways of filtering data within a flow:
- The First one is ODATA filter Query: Let’s first start with this term. ODATA Query style stands for Open Data Protocol and it facilitates the creation and consumption of queries. In other words, it is the jargon you use to set up your query and filters and narrow down your search. So, if you know how ODATA works you would know how to properly write the query and tell the flow where to focus on. The simple way this style works is by having the following structure: Field/column name >>>> Operator >>>> Value/filter
- The second way to filter data is Filter Array: This is by the use of the ‘Filter Array’ component and you can set values, labels and your own values separately.
For a full explanation of this topic I found this article very useful. I highly recommend it.
5. Become familiar with the elements and components: Get Record & List of Records
I don’t intend to explain the whole list of components as this is pointless if you don’t know exactly what they are used for. Instead, I’d like to mention 2 very important ones that you might end up using more than you think.
- List Record (Plural): are used to return all records in the specified entity. You can configure filters to return records that meet the conditions. This is a way of narrowing down the filter of your entity and to retrieve a list (in other words a view) of associated records to perform an action on them.
- Get Records (Singular): are used to return a single record in the specified entity or to retrieve data from related entities. For instance, getting the ‘Type of purchase’ (related entity) from my Contacts (Main entity).
By getting an entity view (Get list), you narrow the query into one category and then, by getting a row (Get record), you are telling the system where to look within that list. If you don’t “call” this data the flow can’t retrieve the data in further steps when you require it. Similarly, if you don’t do it early enough within the flow’s order (as I mentioned above).
For instance, you have your entity: Type of purchase and you want to interact with Type of purchase = Shopping. So you first go and tell the system: please retrieve the list of Type of purchase equal to Shopping. And then you ask the system to get a specific record from that list (or potentially a related record from the entity Shopping). It doesn’t matter if you are not going to use it right away, but then later on you will need to retrieve this data to perform some Actions or set a Condition.
Note: they work as separate elements, you don’t need to use them together and each of them will work independently.
6. Types of queries: Query and FetchXML
Across multiple components all that you are doing is defining queries and conditions. You would see that the components have many options to do so, you can filter by column, filter by row, filter by fetchXML or by expanding your query. There is no right or wrong answer and you might find different ways of doing it (as long as you achieve the same outcome and it doesn’t affect the performance).
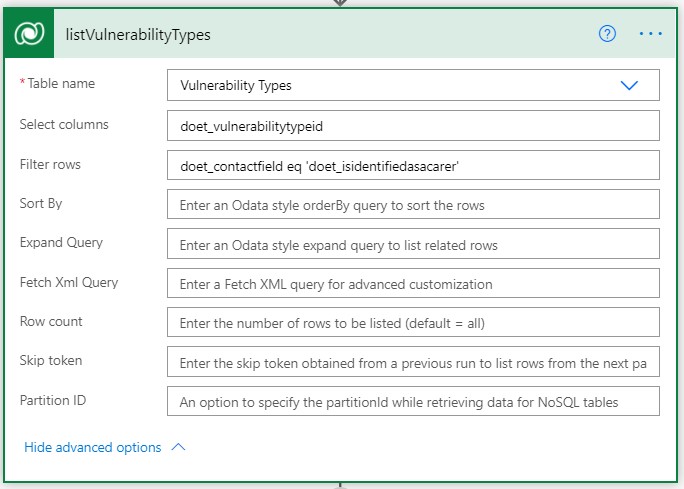
- If you filter by column or by row it could be as simple as assigning a value, for example: dio_typeofcontact eq ‘dio_shopping’. So here you are saying within Type of purchase to only use the ones equal to ‘Shopping’
When you filter by FetchXML, it probably is because it implies a more complex query with multiple conditions or you have a N:N relationship. In order to do that, you can run your search in Advance Finder (if you are using Dynamics 365) and download that search as ‘FetchXML’. Eventually you would also like to edit that fetch and add some extra values if required. It would look something like this:
Note: FetchXML will only work if you are using CDS from the current environment

7. Draft a sketch before starting to build your flow
It sounds very old fashioned, but it does help. To set a well-structured flow, you need to first start drawing the logic, the data and the steps required. You may discover there are some extra steps that you didn’t even consider until you drew them and put them into place. For instance, you know in one Condition you will require the amount of sales for the shopping purchases, so you know you need to “call” that entity and that particular type of purchase before you actually add the Condition.
8. Every character matters
If you have had experience writing any type of code before, you know exactly what I mean. Developers know this well, as it follows the same concept of any programming language, you can’t miss a single dot. Every comma, space, dash or simply any character matters. This could be crucial for allowing your flow to run properly.
Simple as this: if I miss a space between lines that means the flow won’t work. If I happen to add a comma where it is not meant to be, the flow won’t work. If I type “False” instead of “false”, the flow won’t work. Every character matters and I mean this literally.
Well folks I’m still far from being an expert, I’m still learning just like most of you but I hope these strategies and tips help you for the next time you use Power Automate.
If you enjoyed this post please give it a Like and remember, the coffee is on you!
